Blue/Green Deploys and Immutable Infrastructure with Terraform
The original deploy strategy for SongRender  Make your audio stand out on social media SongRender lets you create music visualizers, podcast clips and more to help grow your audience online.
 songrender.com involved using Ansible to provision and build the application servers. I was unhappy with that process for a few reasons.
- The application was built on production servers at the same time as they were serving live requests.
- Old versions of the application would stay on the servers, taking up disk space. I had set up a cron job to clean these up, but cron jobs are fickle and it would still run out of space every so often.
- Side effects of repeated updates and deploys (or worse, failed updates and deploys) could slowly accrue on the servers, a phenomenon known as configuration drift.
I decided to solve these issues using immutable infrastructure 
 www.digitalocean.com/community/tutorials/what-is-immutable-infrastructure : a strategy in which servers are provisioned once and then never updated. If a server’s configuration needs to change or a new version of the application needs to be deployed, an entirely new server is spun up to replace the old one.
Blue/green deployment 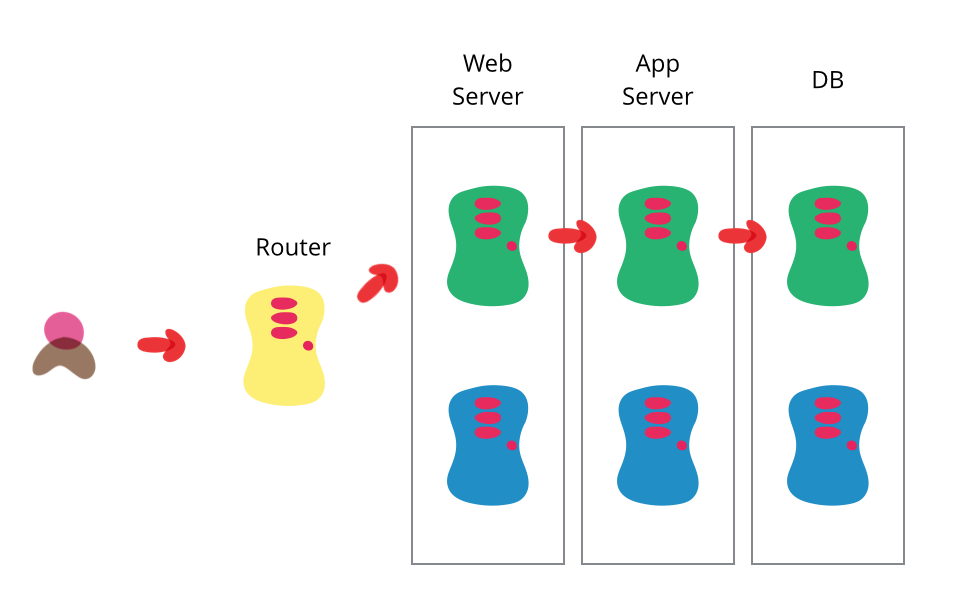 bliki: BlueGreenDeployment Blue-green deployment allows you to upgrade production software without downtime. You deploy the new version into a copy of the production environment and change routing to switch.
 www.martinfowler.com/bliki/BlueGreenDeployment.html is a way of deploying applications that dovetails nicely with immutable infrastructure. Instead of maintaining one set of servers, you maintain two — only one of which is live at any given time. To deploy a new version of the application, you first deploy it to the backup set of servers, then make those servers live.
We’ll implement both of these practices using three technologies:
-
Packer
 Packer by HashiCorp Packer is a free and open source tool for creating golden images for multiple platforms from a single source configuration.
 www.packer.io/ lets you run shell scripts to make changes to a server, then saves the entire disk — including the operating system and whatever changes you made — into a “machine image” that you can use as a base for other servers. We’ll use it to provision our servers, as well as to install and configure our application.
-
Terraform
 Terraform by HashiCorp Terraform is an open-source infrastructure as code tool that enables you to safely and predictably provision and manage infrastructure in any cloud.
 www.terraform.io/ is a “configuration-as-code” tool — you describe your desired infrastructure in a declarative language, and then Terraform diffs it with the infrastructure that actually exists. It’s kind of like React, but instead of modifying a web page it configures your infrastructure.
-
nginx nginx news
nginx.org/ is a popular web server and load balancer. I chose it because I was already familiar with it, but it’s not particularly important that you use nginx here specifically; HAProxy or any other application load balancer should work equally well.
SongRender’s infrastructure is hosted on DigitalOcean, but you can use any cloud provider that supports Terraform  Providers - Configuration Language | Terraform | HashiCorp Developer An overview of how to install and use providers, Terraform plugins that interact with services, cloud providers, and other APIs.
 www.terraform.io/docs/providers/type/cloud-index.html . This article will focus mainly on the Terraform configuration files, and the points at which they integrate with Packer and nginx.
The TL;DR of how this works: one color — let’s say blue — will be live. First, Packer builds a new image in the backup color green. Terraform creates a new set of green servers, using the image Packer just built. Finally, our nginx load balancer swaps the live color with the backup color, sending requests to the newly-created green set of servers instead of the previously live blue ones. To deploy the application again, the process is repeated with the colors reversed.
Since in a given deploy both sets of servers will have gone through both live and backup states, let’s use some more specific names. The “promoted” set will be the servers that begin in the backup state and become live, while the “demoted” set will be the servers that begin live and are changed to backup.
Let’s get to the code. Here’s an abbreviated Packer configuration file server.json for building the application server image1:
{
  "variables": {
    "color": null
  },
  "provisioners": [],
  "builders": [
    {
      "type": "digitalocean",
      "api_token": "YOUR_API_TOKEN_GOES_HERE",
      "image": "ubuntu-20-04-x64",
      "size": "s-1vcpu-1gb",
      "region": "nyc3",
      "ssh_username": "root",
      "snapshot_name": "{{user `color`}}-{{timestamp}}"
    }
  ]
}
The provisioners array should contain whatever provisioning code you need to create your application server. The important bits here are the color variable — the color that will be promoted, which we’ll pass in from the command line — and the builder’s snapshot_name, which is the name of the machine image Packer will create. This name is mostly arbitrary, but it does need to identify the color of the image. When we get to Terraform, we’ll use a regular expression to retrieve the most recent image for which the name matches each color.
We can build now the image with this command:
packer build -var color=blue server.json
To get started, run this once with color=green as well so you have one image for each color.
Now that we’ve created our images, we need to create the Terraform configuration. First, let’s set up our DigitalOcean provider2, which will let us create and modify resources on DigitalOcean:
provider "digitalocean" {
  token = "YOUR_API_TOKEN_GOES_HERE"
}
Next, let’s create the application server. Note that the second two blocks are the same as the first two, but with green instead of blue:
data "digitalocean_droplet_snapshot" "blue" {
  name_regex  = "^blue-"
  region      = "nyc3"
  most_recent = true
}

resource "digitalocean_droplet" "blue" {
  name  = "blue"
  image      = data.digitalocean_droplet_snapshot.blue.id
  region     = "nyc3"
  size       = "s-1vcpu-1gb"
  monitoring = true
}

data "digitalocean_droplet_snapshot" "green" {
  name_regex  = "^green-"
  region      = "nyc3"
  most_recent = true
}

resource "digitalocean_droplet" "green" {
  name  = "green"
  image      = data.digitalocean_droplet_snapshot.green.id
  region     = "nyc3"
  size       = "s-1vcpu-1gb"
  monitoring = true
}
The digitalocean_droplet_snapshot.blue data block retrieves the most recent machine image (like the one we just created with Packer) whose name starts with blue-. Then, the digitalocean_droplet.blue resource creates a server using that image.
If we run Terraform, it should spin up two servers with the images Packer just created:
terraform apply
Now we should have two application servers online: one with the blue image and one with the green image. At this point, we’ve already accomplished our immutable infrastructure goal. Creating a new image for a color with Packer and then running Terraform will entirely replace the server of that color.
For the blue/green deployment, Terraform needs to know which color should be promoted. We can pass that in from the command line when we run Terraform:
variable "color" {
  type        = string
  description = "Which set of servers should be promoted."
  validation {
    condition     = var.color == "blue" || var.color == "green"
    error_message = "The color must be blue or green."
  }
}

locals {
  promoted_servers = var.color == "blue" ? digitalocean_droplet.blue : digitalocean_droplet.green
  demoted_servers  = var.color == "blue" ? digitalocean_droplet.green : digitalocean_droplet.blue
}
The variable.color block takes either blue or green as input. Terraform configuration is declarative, so the color we pass determines which set will be promoted.
The locals block below it creates two groups: one for the promoted servers, and one for the demoted servers. The color that makes up the promoted_servers group is the same one we passed in as variable.color; it contains the servers that will be promoted. The demoted_servers group, then, contains the current set of live servers that will be demoted.
Now we need to point our nginx load balancer at the correct set of servers. But before we can do that, we need to create the load balancer in the first place:
data "digitalocean_droplet_snapshot" "balancer" {
  name_regex  = "^balancer-"
  region      = "nyc3"
  most_recent = true
}

resource "digitalocean_droplet" "balancer" {
  name       = "balancer"
  image      = data.digitalocean_droplet_snapshot.balancer.id
  region     = "nyc3"
  size       = "s-1vcpu-1gb"
  monitoring = true
}
I use Packer to provision the load balancer as well (which is why it uses a digitalocean_droplet_snapshot as its image) but you can provision it however you’d like.
For the purposes of this tutorial, we’ll assume your load balancer is running nginx. Here’s the configuration3:
upstream backend {
  %{ for ip in promoted_servers ~}
  server ${ip};
  %{ endfor ~}
  %{ for ip in demoted_servers ~}
  server ${ip} backup;
  %{ endfor ~}
}

server {
  listen 80;

  location / {
    proxy_pass http://backend;
  }
}
The relevant portion is that upstream.backend block up top. We use Terraform’s templating capabilities templatefile - Functions - Configuration Language | Terraform | HashiCorp Developer The templatefile function reads the file at the given path and renders its
content as a template. www.terraform.io/docs/configuration/functions/templatefile.html to enumerate both sets of servers. The demoted set is marked with the backup directive Module ngx_http_upstream_module
nginx.org/en/docs/http/ngx_http_upstream_module.html#backup , which means it will be passed requests only when the promoted set is unavailable. Listing both sets of upstream servers this way prevents requests from being dropped in case the promoted set isn’t immediately ready to begin serving requests.
Unfortunately, Terraform doesn’t have any built-in mechanisms for keeping this file up–to–date. That brings us to the final piece of the puzzle: the null resource Terraform Registry  registry.terraform.io/providers/hashicorp/null/latest/docs/resources/resource .
A null resource is an escape hatch within Terraform — a way to execute arbitrary code. We’ll use it to update our load balancer with an nginx configuration containing the correct server IP addresses on every deploy. Here’s what it looks like:
resource "null_resource" "provision_balancer" {
  triggers = {
    balancer = digitalocean_droplet.balancer.id
    servers = "${join(",", concat(local.promoted_servers.*.id, local.demoted_servers.*.id))}"
  }

  connection {
    type = "ssh"
    host = digitalocean_droplet.balancer.ipv4_address
  }

  provisioner "file" {
    content = templatefile("./nginx.conf", {
      promoted_servers    = local.promoted_servers.*.ipv4_address
      demoted_servers = local.demoted_servers.*.ipv4_address
    })
    destination = "/tmp/songrender.com"
  }

  provisioner "remote-exec" {
    inline = [
      "sudo mv /tmp/songrender.com /etc/nginx/sites-available/songrender.com",
      "sudo ln -sf /etc/nginx/sites-available/songrender.com /etc/nginx/sites-enabled/songrender.com",
      "sudo systemctl reload nginx"
    ]
  }
}
The top block, triggers, tells Terraform when it needs to execute the resource again. In our case, that should happen when the load balancer ID or any of the server IDs change.
After that, there are two provisioners. The first, file, generates the nginx configuration with the correct IP addresses and uploads it to a temp folder on the load balancer’s filesystem. The next moves it to the nginx configuration folder for our site and reloads nginx.
That’s blue/green deployment! Now we can spin up a whole new set of servers and cut over to them with this pair of commands:
packer build -var color=blue server.json
terraform apply -var color=blue
We’ve also gained the ability to easily roll back if we discover we’ve introduced a bug. Without building a new image, we can simply run terraform apply and flip the color back:
terraform apply -var color=green
There’s something we can do to make this even better. With our current configuration, we’re always running two sets of servers — even when we’re only using one. That costs money!
Let’s introduce another variable:
variable "cautious" {
  type        = bool
  default     = true
  description = "Whether to keep the demoted server set running."
}
When it’s set to true, both sets of servers will remain up. When it’s false, running terraform apply will destroy the demoted set.
We can accomplish this by slightly modifying our server configuration:
locals {
  num_servers = 1
}

resource "digitalocean_droplet" "blue" {
  name  = "blue-${count.index + 1}"
  count = var.color == "blue" || var.cautious ? local.num_servers : 0
  image      = data.digitalocean_droplet_snapshot.blue.id
  region     = "nyc3"
  size       = "s-1vcpu-1gb"
  monitoring = true
}

resource "digitalocean_droplet" "green" {
  name  = "green-${count.index + 1}"
  count = var.color == "green" || var.cautious ? local.num_servers : 0
  image      = data.digitalocean_droplet_snapshot.green.id
  region     = "nyc3"
  size       = "s-1vcpu-1gb"
  monitoring = true
}
The important new line is the count property, which tells Terraform how many servers we want. Instead of always creating each set of servers, we look to var.color and var.cautious. If the server’s color matches var.color, or if var.cautious is true, we create our normal number of servers. Otherwise, we destroy all of them.
Our deploy process is now two steps. First, the normal command to deploy:
packer build -var color=blue server.json
terraform apply -var color=blue
This is where we check that everything is working properly. If it’s not, we flip the color and run terraform apply to roll back. If things are looking good, we run terraform apply with the same color and var.cautious set to false:
terraform apply -var color=blue -var cautious=false
You can find the source for everything here on GitLab  blue-green-deploys-and-immutable-infrastructure-with-terraform · main · jake.nyc / Code Samples · GitLab GitLab.com
  gitlab.com/jake.nyc/code-samples/-/tree/main/blue-green-deploys-and-immutable-infrastructure-with-terraform .
Footnotes
-
The DigitalOcean API token is included in the Packer file here for simplicity, but you should use Packer variables
 Packer | HashiCorp Developer Explore Packer product documentation, tutorials, and examples.
 -
Just like with Packer, you should use a Terraform variable
Input Variables - Configuration Language | Terraform | HashiCorp Developer Input variables allow you to customize modules without altering their source code. Learn how to declare, define, and reference variables in configurations. -
This will proxy any requests made on port 80 to your servers. When you’re configuring nginx for production, you should probably serve traffic over HTTPS
 Securing HTTP Traffic to Upstream Servers | NGINX Documentation Secure HTTP traffic between NGINX or NGINX Plus and upstream servers, using SSL/TLS encryption.
 docs.nginx.com/nginx/admin-guide/security-controls/securing-http-traffic-upstream/ . ↩